
After reading part one and part two of the Shopify SEO guide you should now be well on your way to a well optimised online store. In our final of this trilogy we will delve into the art of internal linking, social media and connecting an XML sitemap.
 Shopify SEO audit for your online store TODAY ⬇
Internal Linking
When customers think of links they tend to think of external links that point back to their website, perhaps from a press release or a blog. However, this is only half of the story of links. The other half depends on how you link internally.
What is an internal link?
Simply put, an internal link is any hyperlink on your website that connects to another webpage on that same website. For example, on your homepage you have a link to a collections page that would be classed as an internal link. All three examples below show that internal linking can be done from any page to any page on your website.
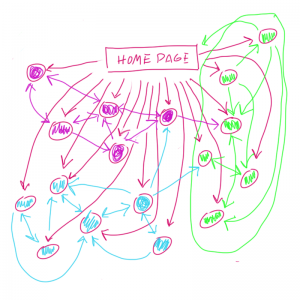
Homepage ⇒ Collections Page or Collections Page ⇒ Product Page or Blog Post ⇒ Collections Page
Why is internal linking important?
There are two main reasons why internal linking is important:
- It helps the user navigate around your website easier. A happy user that is able to find what they are looking for quickly are more likely to convert into a paying customer. Moreover, a user that stays on your website longer is also more likely to purchase as they become acquainted with your brand. By creating relevant internal links in the correct areas of your website you can do just that.
- Internal links also help search engine bots crawl your website more efficiently. This helps with SEO as this increases the likelihood that more of the pages on your site will be indexed in the search engines. You can also define each internal link with ‘anchor text’ that helps define what each page is about with the aim of boosting your rankings for keywords in the search engines.
What is anchor text?

Anchor text is simply the words you see on a clickable link. This is an example of anchor text: Get started using Shopify with a 14 day free trial. It may be highlighted in blue, or purple or it may not have any highlighting at all. What it will do is link to another page or document either on your website or to another website.
How do I create an internal link on Shopify?
- On any page in the backend of your Shopify console right click your mouse and highlight a piece of text in the Description box
- Click the ‘Insert link’ chain icon in the toolbar
- In the ‘Link to’ field type or copy and paste the web page address you want to link to
- Add a ‘Link title’ describing which page you are linking to
- Click the blue “Insert link” button
- You will see that the text you highlighted is now an internal link
What’s best practice when internal linking?
When thinking about internal links always think about the user first. If the internal link seems unnatural within the content, it's unnatural. Here are a few more tips:
- Vary your anchor text. Don’t always use the same words and use a mix of long words such as “Check out our new range of men’s gloves” and “men’s gloves”. A balanced internal link profile is key.
- Use your blog as a springboard for internal links. Your blog posts allow you to funnel traffic from the search engines to your products, collections and homepages in addition to other blog posts. Make good use of internal linking from this area of your Shopify site.
- Guide the user where they want to go. A user may land on a blog post about the importance of eco-friendly winter gloves but consider your aim of writing this post. Is it to get subscribers to your blog or do you want to funnel that user through to as particular product page to purchase these outstanding eco-friendly winter gloves? You'll need to think about internal linking if so.
Connect Social Media
We presume you have set up social media accounts for your ecommerce store in order to get word out about your brand. If you haven't setup your social media accounts yet, what are you waiting for? Read why social media is good for your Shopify site. It can be assumed your competitors are already on it and they aren't then you can give yourself a definite advantage.
Why create social media profiles?

Some of the distinct advantages include the ability to showcase your products, promote your brand, gather followers that could turn into potential customers, keep up to date with industry relevant news and boost the domain authority of your own website.
What are the best social media accounts to use?
This is dependent on what you sell. If you are a service based organisation then writing effective content on your blog and promoting it via Facebook, Twitter and Google+ may be the best way to go. If you sell products you may want to showcase these on more visual forms of social media such as Pinterest, Instagram in addition to the big three mentioned above.
How often should I update my social media channels?
As a rule of thumb we recommend:
- Facebook– At least once per day, but no more than three times per day. There is a fine line on Facebook of what constitutes entertainment and annoyance
- Google+ – You can update a lot more on Google+ but again not too much. We recommend between 3 – 7 posts per day.
- Twitter– Due to the real time updating on this platform, messages come and go quite quickly especially if somebody is following a lot of people so updating here can be done a lot more frequently. Aim for a tweet per hour
How do I connect my social media pages to my Shopify site? This is dependent on your Shopify theme but this is the usual way:
- Login to your Shopify console
- Click ‘Themes’ in the left hand side menu
- Click ‘Theme Settings’
- Click the ‘Footer’ tab
- You should see input fields for each of the social media pages you want to add
- Click ‘Save’
You social media icons should now show up in the site wide footer on your website allowing users to click through.
XML Sitemap
An XML sitemap serves the purpose of helping search engines find all the pages on your website and also provides information on how often your website is updated. You can usually find this sitemap on your web address at yourwebsite.com/sitemap.xml replacing "yourwebsite" with your own domain name. Take a look at the example below of our own Shopify Builder XML Sitemap: 
It's just a snippet and not the whole sitemap but you can see from this example what the XML sitemap defines.
URL This includes the web address of each page on the website, also known as a "URL".
Priority This means which pages are the most important so the search spider can crawl your pages in a particular order.
Change frequency This defines how often a page's content is changed, the more frequent the change the more often the search spider will return to that page.
Last Modified (GMT) This shows the last time that particular page was edited. The (GMT) may change to your own time zone depending on where you are located. Please note on the Shopify platform the XML sitemap may not be this defined but it will follow the same process.
How to create an XML sitemap? One of the great things about the Shopify platform is that when you create a new ecommerce website the XML sitemap is automatically generated. Now all you have to do is submit that sitemap.
How do I submit a sitemap? Remember in the second SEO guide in this series we spoke about Google Webmaster Tools. Well now all you have to do is:
- Login to Google Webmaster Tools
- Click ‘Crawl’ in the left hand side menu
- Click ‘Sitemaps’
- Click the red ‘Add/Test sitemap’
- Your domain should now show up, type in ‘sitemap.xml’
- Click ‘Submit Sitemap’
- Your sitemap is now submitted to Google
So there you have it, our three part Shopify SEO tips guide to help new or existing stores boost their rankings in the search engines, increase conversions and ultimately boost revenue. If you have any more questions feel free to speak to our Shopify SEO consultants who will be happy to help.