Migration Guide Part 1 - Discovery Audit
Before we begin any migration work, we complete a mini-audit on the site. This discovery phase makes sure SEO is integrated into the entire project plan. We also gather crucial learnings about the existing site which guides the rest of our migration process.
Welcome to part 1 of our Shopify Migration Guide where we’ll talk through our pre-migration discovery audit process.
The first stage of our migration process is a discovery phase where we audit the existing website and its organic performance. The purpose of this stage is to gather data and insights which are used to plan the rest of the migration process.
The key items we need to learn are:
- How do we integrate top class SEO into the project scope?
- Which keywords drive traffic to the site?
- How is organic traffic distributed across the site and what are the key traffic-driving pages?
- Are there technical issues that could affect the success of the migration?
Summary
There are 5 key sections to our pre-migration discovery audit.
1 - Project Scope Review
In this section we ensure effective SEO planning is integrated into the project scope.
2 - Keyword Research
The keyword research and analysis stage provides us with information about the visitors who currently visit the site. This reveals the most important keywords, topics and audiences that drive current SEO performance.
3 - Content Research
It’s crucial to understand how content on the existing website performs from a search point of view. Ensuring traffic driving pages are properly represented on the new site is key to ensuring a successful migration.
4 - Backlink Analysis
One of the biggest risks during a migration is damaging your established backlink equity. In this stage, we conduct a review of the website backlink profile and identify the most important backlinks currently pointing at the site.
5 - Technical Audit
It’s important to be aware of any technical issues that could affect how search engines process the migration. In this section, we discuss the most common technical problems we encounter pre-migration and how to handle them.
1 - Project Scope Review
The very first step is to make sure the SEO team fully understands the scope and requirements of the project. Baking SEO into the initial website planning stages is the best way to avoid troublesome SEO issues later down the line.
Website improvements and developments are fantastic, so long as they are integrated into the SEO strategy. At Eastside Co, our SEO team gets involved with all project scoping and planning discussions at the very beginning. This is to highlight any parts of the project scope that could disrupt search engine rankings. It’s better to have these discussions before any design and development begins.
Some of the key areas that need to be established are:
- Will any part of the scope disrupt how search engines crawl and index content?
- Does the migration affect the website domain?
- How many websites are involved in the migration?
Actions
Review the project scope and ensure there’s nothing planned which could cause unnecessary SEO disruption. Always ask yourself “How will search engines react to this change?”
2 - Keyword Research
Next is keyword research. Our goal here is to understand which terms and phrases generate the bulk of organic traffic to the site. Whilst we are interested in finding growth opportunities, our main focus is: which are the most important keywords the site ranks for right now? Preserving the rankings of those keywords is vital.
a) Download Search Console Keyword Data
Open a new Google sheet and make sure you have the Analytics for Sheets Extension installed. This tool uses the Search Console API to download your keyword data. When you use the standard Search Console interface, there’s a 1000 row limit on how many keywords you can export, but with the Analytics for Sheets Extension you can download everything.
Once the extension is installed, in your Google Sheet go to:
Add Ons > Search Analytics for Sheets > Open Sidebar
This will open the Search Analytics for Sheets sidebar.
- Under ‘Verified Site’, select the Search Console property you need to access the data from.
- For Date Range, select the last 3 months. (If the date range is longer than 3 months, the keyword data may be outdated.)
- Under ‘Group By’ select ‘Query’.
- (Optional) - Add a country filter. The default export will include all global keyword data so filtering by country can make the results more reflective of your audience.
- Press ‘Request Data’
This will open a new tab containing all the keyword data from Search Console. This will include the number of clicks and impressions each query generated, as well as the average ranking position and click-through-rate.
b) Segment Your Branded Queries
The initial Search Console export gives us an immediate view of what keywords drive traffic to the site. But we need to know which of these queries are most important.
This is where Branded vs Generic keywords come in. A “branded” keyword references your brand within the search query. These searchers are seeking you out on Google. It will be much easier to maintain your rankings for these search terms, even if a migration goes wrong.
Generic keywords don’t mention your brand at all. In most cases, generic keywords are the most important because they are the search terms through which people “discover” your site. Generic keywords normally represent a much larger audience and are harder to rank for.
We need to separate branded and generic keywords in your Search Console export. Add a new column to the Search Console Export sheet and name it ‘Branded’. In the first cell in the new “Branded” column (B2), enter the following formula.
=SUMPRODUCT(--ISNUMBER(SEARCH({"brand name”},A2)))>0
Replace “brand name” with the name of your brand. If people search for your brand using different terms, you can include these as a comma-separated list {“brand name 1”, “brand name 2”, “brand name 3”}
Copy and paste this formula down through all the rows in the ‘Branded’ column. Any keyword which mentions your brand will be flagged as TRUE. Add filters to the column headers and set the filter on the ‘Branded’ column to FALSE. This will filter out any branded keywords.
That leaves us with the most popular generic keywords visitors use to discover your site. These are your most important keywords and the ones for which you need to preserve the rankings throughout the migration.
c) Further Keyword Research
We also use SEO tools such as Ahrefs and SEMRush to extract even more keyword data. 3rd party tools such as these provide extra information about your keywords that isn’t visible in Search Console (such as monthly volumes and SERP features).
This analysis normally reveals opportunities for organic growth by identifying valuable keywords that it’s possible to improve visibility for.
d) Set Up Rank Tracking
Review all of the keyword research and build a selection of priority keywords. The majority of these should be existing rankings which you need to protect. Also include some growth opportunity keywords you found in your expanded keyword research.
Add these priority keywords into your rank tracking software. You need to collect a baseline of rank history data before you migrate. This baseline will be used to measure the visibility of your core terms once the migration begins.
3 - Content Research
The next part of the discovery phase is auditing how content on the current site performs. You need to know which are the traffic-driving pages on the website. Safeguarding the performance of these pages is key to ensuring a successful migration.
Download Page Performance Data
For this stage we’ll use the Search Analytics for Sheets tool again.
- Open a new Google Sheet and ensure you have the Search Analytics for Sheets extension installed
- Under ‘Verified Site’, select the Search Console property you need to access the data from.
- For the date range, pick whatever you feel is most appropriate. We tend to select 16 months because we want as much page data as possible.
- Under ‘Group By’ select ‘Page’
- Press ‘Request Data’
Just like the keyword research stage, this will open a new tab in your Google sheet and populate it with the impressions/clicks data for each page on your site. The list will be ordered by ‘highest clicks’. Therefore we know the pages at the top of the list are most important in terms of organic traffic generated.
Distribution of Organic Traffic
Most of the sites we migrate display the same pattern. The homepage will be the biggest driver of traffic. There will be a selection of pages that collectively bring in the most of the search traffic. Then the majority of pages generate very little traffic at all.
Using the total clicks each page has generated isn’t the best measure of page importance. Total clicks is just a number with no indicator of whether that ‘number’ is significant or not.
So we use a technique that measures what percentage of total search traffic is generated by each segment of top pages. For example:
- Top 10% of pages generate 70% of search traffic
- Top 20% of pages generate 80% of search traffic.
- Top 50% of pages generated 90% of search traffic.
- Top 75% of pages generate 98% of search traffic.
This is a form of power law analysis and is useful for understanding where your search traffic goes. Looking at the example above, we can see that the top 10% of pages generate 70% of search traffic. Any effect on those top 10% of pages will have a disproportionate effect on total search traffic.
In our example above, the top 20% of pages account for 80% of traffic. Some might recognise this as an example of the 80-20 rule (also known as the Pareto Principle).
So how does this affect your migration? Well you should look at your page performance data in this format. Understand what proportion of search traffic goes to your top segments of pages. This insight pinpoints where your most important pages are. You need to protect these pages because any damage to their SEO performance will have a larger impact on the entire site.
How To Measure Distribution of Search Traffic
We can use the Search Console page data export to analyse the spread of traffic. In the document that you used to export your top pages, add an extra column and name it “Clicks %”. In the first cell enter the following formula:
=sum(B$2:B2)/sum(B:B)
Copy and paste this formula down all cells in the ‘Clicks %’ column and set the display format to ‘Percent’. This will sum the total traffic to each page with all the pages above it in the list. It then calculates what % that makes of total traffic. The top page should have the lowest value and the very bottom page should have 100%.
Name the next column ‘Count %’ and enter the following formula in the first cell, then copy and paste this down the entire column:
=(row()-1)/(counta(A:A))
This will calculate what percentage of total pages, this page and the previous pages account for. The first cell should be a very low percentage and the last cell should be 100%.
When this is done, you can scroll down to see how your traffic is distributed across your pages. The ‘Count %’ column will show you the breakpoints of top pages, and the corresponding ‘Clicks %’ column display how much of your total traffic is generated by those pages.
Top Pages
The pages in your top segments are the most important. They’re the pages that bring the bulk of your traffic into your site. They have to exist on the new site and need to be given extra attention throughout the migration process. If these pages were to suffer a drop in rankings, the overall effect on search traffic will be greater.
Bottom Pages
We rarely see an 80-20 distribution on the sites we audit. More often than not, the top 5% of pages generate over 90% of search traffic. If the distribution of traffic is heavily weighted like this, then you should try and understand why. Why do 95% of pages generate less than 10% of search traffic? This suggests there are a lot of pages indexed on Google that don’t contribute to overall SEO performance.
This ‘could’ be an indicator of ‘low quality’ content. You may want to consider whether all the pages in the lower segments have to be migrated to the new site. By no means are we suggesting to cull content just because it generates very few clicks. But there could be an opportunity to remove bloat from the site.
This needs careful analysis by an SEO expert who can identify low-quality content and recommend an appropriate course of action.
Action
Identify where the majority of your search traffic lands. These are your priority pages. You need to ensure these pages are represented on your new site.
Content Quality
Next we want to evaluate the quality of content on the existing website. For a clean migration, it’s best to re-use as much of the current content as possible. This reduces the amount of variables that change and helps search engines process the migration.
Where possible, we advise maintaining the same headings, text-content and page titles as your old pages. However, if the content on your current site is low-quality, then it’s worthwhile making content improvements.
How do we assess content quality? The first step is to crawl the entire site with Screaming Frog. The crawler will automatically extract content from key elements such as page titles, meta descriptions and headings.
Extracting Extra Content for Review
We also want to review the text content from key areas on the site. As we’re dealing with a Shopify migration, we mostly care about ecommerce content such as the category description text and the product description text. We can do this by configuring the Screaming Frog crawler to extract specific HTML elements from pages on the site.
- Open Screaming Frog
- Go to ‘Configuration > Custom > Extraction’ and then click ‘+ Add’
- Rename Extractor 1 to ‘Category Text’.
The next option is a ‘Selector Type’. There are three types (XPath, CSSPath or Regex). Each represents a different way of looking for specific elements in the HTML source code. Follow this process to find the XPath or CSSPath on your site:
- Go to the website in Google Chrome and visit a category page.
- Right click on the category description and press ‘Inspect Element’. This will display the HTML element that holds the category description.
- Right click on the HTML element and open the ‘Copy’ menu
- This will reveal options to copy the XPath or Selector (CSSPath). Copy the one you want and go back into Screaming Frog.
- Make sure you have chosen the right selector option (XPath or CSSPath depending on what you copied) and paste into the field. Change the last option to ‘Extract Text’.
- Press ‘Ok’ to close

Once the category text is sorted you should consider repeating the process for product descriptions. On the Screaming Frog ‘Custom Extraction’, press the ‘+ Add’ button and you can add a second element to extract. All you need to do is find the HTML selector that holds your product descriptions.
We’d recommend testing crawling a few pages in Screaming Frog’s List Mode to ensure the text extraction is working. Now when you crawl the entire website, Screaming Frog will extract the text content from any element that matches your selector.
What To Look For When Assessing Content Quality
Once you’ve completed your Screaming Frog crawl, you begin assessing the content. The goal here is to evaluate whether the existing content is fit for purpose. The things we look out for are:
- Duplicate Content - Do different pages re-use the same content? If so, you may need to create further unique content for your new site.
- Thin Content - Are there pages with very little content of value? In these cases you should consider expanding the pages to give them more substance.
- Over Optimisation - Do pages go too far in their content optimisation? If you target keywords too forcibly it reads poorly for search engines and visitors. You should look at making the content more natural.
- Ambiguity - Is there content which has no clear purpose of intent. If it’s ambiguous to a reader it will be the same for a search engine. Content should be to-the-point and demonstrate clear purpose and value.
Action
Review the crawl data and consider these content assessment suggestions. If you find areas that need improvement, try and get these actioned before the migration.
4 - Backlink Analysis
Backlinks are one of the most important factors that affect your search engine rankings. Search engines use backlinks as a way to measure how trustworthy your site is. When it comes to migrations, you need to ensure your established backlink equity is transferred to your new site.
For this part of the discovery audit, we review the backlink profile of the website. We need to understand:
- Who links to the site?
- Where do those links go?
- Which are the most important backlinks?
- How do we maintain the existing backlink equity?
- Is there a disavow file?
When the migration happens, it’s important that the pages that hold backlink equity are redirected to a like-for-like page on the new site. This has to be a clean A > B redirect with no redirect hops in between. We also need to ensure the new versions of those pages are integrated into the new site so that pagerank is distributed to other pages.
This analysis can be done using an SEO backlink analysis tool such as Ahrefs or SEMRush.
Actions
- Review the site in a backlink analysis tool and note which are the most important pages in terms of inbound links. You need to ensure those pages exist on the new site and have similar content to the current site.
- Review Search Console and see if there is a disavow file in place. If your migration involves a domain change, the disavow needs to be uploaded to the new Search Console property.
5 - Technical Audit
Finally, we run a mini technical audit on the website to find any issues that could affect the migration.
How to do a technical SEO audit is a separate topic, but I will run through our process and the things we look out for. For this section you’ll need access to Search Console and an SEO crawler such as Screaming Frog.
What follows isn’t a set-in-stone technical audit and you don’t have to complete every step. This is general guidance on the areas we evaluate for our pre-migration tech audit.
Site Size
One of the key things we want to know is: how big is the site we’re migrating? By ‘how big’ we are referring to how many pages exist on the site. It’s important to understand this because it affects how many redirects need to be created. There are different ways to calculate site size but in our experience, the quickest and most accurate method is to use the Search Console Coverage Report.
The Coverage Report counts all the pages that Google has encountered when crawling the site.
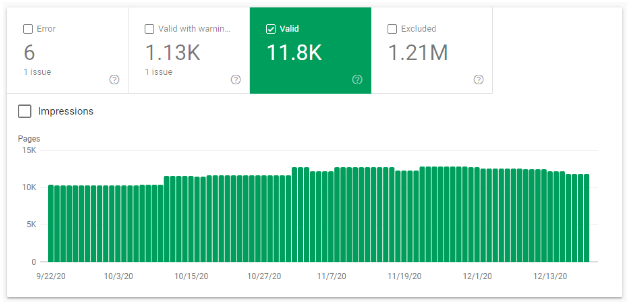
What we care about most is the number of ‘Valid’ pages. These are the pages which Google has crawled and then indexed. It’s these pages which can rank and generate search traffic.
But we also have to consider the other pages in this report. Of particular interest is the ‘Excluded’ report. This counts the number of pages that Google has encountered but not indexed.
Even though these pages aren’t indexed on Google, they most likely have to be redirected somewhere when you migrate. If the pages aren’t redirected then once you migrate, the pages will return a 404 error. Whilst 404s are a normal part of the web, you want to avoid suddenly 404ing a large chunk of your site.
Actions
- Review the Search Console Coverage Report and each of the sections
- Log how many pages are reported in each section to calculate site size
Information Architecture
Information architecture is the structure used to organise a website. It’s made up of the pages that exist on the site, and the internal links between those pages. As well as helping visitors navigate your website, the information architecture gives search engines clues as to what each part of your site is about.
Internal linking structure is one of the site elements that can be most disrupted by a migration. If your new website doesn’t link internally in the same way as your old site then it creates extra ‘changes’ for Google to figure out.
However, when it comes to information architecture, the priority should always be UX and helping your visitors navigate to the content they need with ease. SEO should be layered on top of the UX to help search engines understand and navigate the site too.
The image below is an example of a new information architecture that could be damaging for SEO.

In the example, the old website has a clean information architecture where key sections of the site can easily be navigated to.
In the new website structure, Page B is no longer linked to from the homepage. This in turn reduces the prominence of pages B1,B2 and B3. Page C also no longer links to pages C1 and C3 which again reduces their importance in the site architecture.
All of these internal linking changes will disrupt Google’s understanding of the website. As much as possible, you should retain the internal linking structure from the old site.
Actions
Build a sitemap that represents the internal linking structure of your existing information architecture. This will be used to plan your new site structure in the next section.
Canonicalisation
Canonicalisation is an SEO mechanism that helps search engines understand which URL should rank when there are clusters of duplicate pages. The canonical tag is designed to prevent low-value, duplicate pages from getting indexed. The most common way to declare a canonical is using the rel=canonical tag.
The problem is that canonicalisation is just a ‘hint’ to search engines. They can choose to ignore your canonical declarations if other signals conflict with your canonical. In our experience, lots of websites suffer from canonicalisation issues. This can result in Google indexing and ranking the wrong pages.
It’s important to understand if your site has canonicalisation issues before you migrate. Let me demonstrate this with an example:
You have two pages (Page A and Page B). Page B is canonicalised to Page A. The expected behaviour is that only Page A ranks on search engines. However, other signals conflict with your canonicalisation and Google has actually indexed both Page A and Page B. They both rank and generate search traffic.
Now consider the following:
- You don’t want to repeat this scenario on the new site. So you need to carefully plan your new site structure and canonicalisation to avoid this issue.
- You’re now in a position where you have two traffic generating pages. Whilst this isn’t what you intended, the migration plan needs to consider both pages to ensure you retain their traffic.
At this stage of the migration process, you’re looking for instances where your current canonicalisation isn’t working. When you find these instances, you have to consider how it affects your migration plans.
The best tools to use for this analysis are Search Console and Screaming Frog.
In the ‘Excluded’ section of the Search Console Coverage Report, there is a section called “Duplicate, submitted URL not selected as canonical”. This report will list pages where the Google-Selected-Canonical is different from the User-Declared-Canonical.
In other words, on these pages Google has ignored your canonical.

Actions
- Review the Search Console Coverage report and dig into the ‘Excluded’ section. Do you have pages excluded due to “Duplicate, submitted URL not selected as canonical”. If so, try and understand why.
- Back in the Search Console Coverage report, if you click into the green ‘Valid’ section, there will be two rows:
“Indexed, not submitted in sitemap”
“Submitted and indexed”
- These rows indicate the number of indexed pages that are or aren’t in your XML sitemap. A disproportionate number of “Indexed, not submitted in sitemap” could be a sign that Google has indexed a lot of non-canonical content. In this instance you should investigate what non-canonical content has been indexed and why.
- Crawl your entire site with Screaming Frog. The crawl data will report how pages across your site are canonicalised. Does this correlate with what Search Console shows is indexed?
- Go back to the Search Console Pages export you used in the content research section. Browse through the URLs at the bottom of the list. Are there odd URLs that you wouldn’t expect to generate organic search traffic? If so, this could be a signal of indexed, non-canonical content.
International/Language Targeting
Does the website have any internationalisation in place? If so, then careful consideration needs to be given to how the migration can affect this. The primary way to manage international SEO is using a solution called Hreflang.
Hreflang tags indicate to search engines when there are alternate versions of a page intended for specific languages or regional audiences. For hreflang to validate, there has to be reciprocal hreflang tags between groups of pages. For example, if Page A had a hreflang tag pointing at Page B, it would only be valid if Page B had a hreflang tag pointing at Page A.
You can learn more about Hreflang and Shopify in this article from our blog.
When you migrate to Shopify, all of your URLs are going to change. This means if you have hreflang tags in place, then those hreflang relationships need to be updated to reflect your new Shopify URLs.
You need to understand if there is hreflang in place on the site you’re migrating. If you launch your new site without updating your hreflang tags, it could seriously disrupt your organic visibility.
Actions
- Crawl website with Screaming Frog and ensure the spider settings is set to crawl hreflang. Use the crawl to assess what hreflang exists on the current site.
- If there is hreflang in place you need to ensure the same hreflang tags are replicated on the new site.
- If there are other non-Shopify websites involved in your hreflang relationships, they will need to update their Hreflang tags to match your Shopify URLs.
Existing Redirects
It’s likely there are already redirects in place on the existing website. When you migrate to Shopify, you need to ensure that legacy redirects still function. If redirects are implemented using your existing system, the redirects will stop working when you migrate to Shopify.
Action
Export all existing redirects. You need the FROM and TO URLs. These will be used when we move onto the redirects section.
Schema
Schema (also called structured data) is a layer of code that organises content data into a structure which search engines understand. With proper schema in place, search engines can better understand your content and your SERP listings can be enhanced with rich snippets.
As part of your migration planning you need to check what schema exists on the current site.
There is product-schema that all ecommerce websites should include on their product pages.
The best way to evaluate the schema on a site is using Google’s Structured Data Testing Tool. Simply enter sample URLs from the current site into the URL field and the tool will then generate a report detailing any schema found on the page. Any schema found on product pages needs to migrate onto the new site with the same schema properties.
You can also go into the ‘Enhancements’ section on Search Console for further information about schema on the existing site. These reports display information about SERP enhancements the site currently is eligible for.
Most of these are influenced by schema so the report gives you further insight into what schema you need to migrate to the new site. This is useful for finding any other types of schema that the site includes.
Actions
- Put existing product pages into the Structured Data Testing Tool and note the schema items found.
- Review the Search Console Enhancements and assess what other types of schema are found on the site.
Discovery Audit Summary
We’ve covered a lot of information in the pre-migration discovery audit. To recap, the most important things you need to consider:
- Do you fully understand the project requirements and have you scoped how the new website could disrupt SEO?
- What are the primary generic keywords that drive traffic to the site? Ensure you have rank tracking in place to measure visibility for these terms.
- What are the main organic traffic driving pages on the current site? Ensure these are properly represented on the new site.
- Does the current site have content bloat of content quality issues? If so, consider how you can prevent those issues being transferred to the new site.
- What are the most important backlinks and pages that give the current site authority? How will you ensure the existing link equity is transferred to the new site?
- Do you have a true understanding of the size of the site and how many pages there are to redirect?
- Does the site use any international hreflang targeting?
- What schema does the current site use and how will you migrate this to the new site?
GO TO PART 2 - SITE STRUCTURE PLANNING